With over 6.8 billion smartphone users scattered across the globe, owning a website can’t be such a bad idea.
It’s your home online where you can say, showcase, and sell just about anything. You probably know that already.
So how do you build a website on WordPress?
You have two options:
- Do it yourself (DIY)
- Outsource it
Doing it Yourself.
If you do it yourself, you’ll learn all you need to know about designing and managing a WordPress website. It’s called, “getting your hands dirty.”
You also save money you would have paid to a developer.
But you may end up spending time and energy you would have otherwise used for something else.
This also means you may also have to wait many days or weeks because you are working on your website.
And you may make mistakes. But I have your back so you don’t have to worry about that part.
The other option is outsourcing the work.
It’s simple.
Get someone who knows how to do it, give them your specifications, and watch them build your new home with style.
And when they’re done, they can send you instructions on how to run your new digital space. Nice and clean.
When you outsource, you save time and avoid the mistakes many people make trying to figure things out for themselves – with time they don’t have.
However, outsourcing can be costly.
But no worries here too. Hire me on Fiverr and I’ll set things up for you easy peasy at an affordable rate.
Table of Contents:
- Set Up Your WordPress Website (DIY)
- 1. Get Your Domain Name
- 2. Get Hosting
- 3. Pick and Install a Theme
- 4. Install Necessary Plugins
- 5 Set up your homepage
- 6. Set your Fonts
- 7. Design Your Blog Page
- 8 Design Your Single Post Page
- 9 Set up an Archive page
- 10. Set up Info and Legal Pages
- 11. Create a logo for your website
- 12. Set up Necessary Plugins
- 13. Site Launch Checks and Settings
- 14. Launch Your BRAND NEW WEBSITE!
- FAQs on WordPress Website Setup
Set Up Your WordPress Website (DIY)
Start by getting a roadmap. Many people complicate things, go back and forth because they don’t have a clear path or set of instructions to follow.
You don’t have to walk that road.
Here is how you will go about making your WordPress website in 14 well-defined steps:
- Get your domain name
- Get Hosting
- Pick and install a theme (have your brand colors in mind while editing your site)
- Install necessary plugins
- Set up your Homepage
- Set your Fonts
- Design your blog page
- Design your single post page
- Design your Archive page
- Set up info and legal pages
- Create a logo for your website
- Set up necessary plugins
- Go over a few site launch checks
- Launch your website
With this well-defined structure, you can set up your website like a pro and have it looking great even if it’s your first time.
Using that framework, I can get your website up and running within a few hours. If you’re a beginner, don’t be jealous please. Practice, they say, makes perfect.
Now let’s go into the details of how to go about each step.
If you have the time, feel free to reward yourself as you complete each step. Let’s get started on our dream site.
1. Get Your Domain Name
As the address people will use to find you (your website) on the internet. It’s what they type into the URL address bar in the browser to visit your lovely website.
So you want to pick something that represents you and what you do. But you also want to keep it simple so it’s brandable and of course, easy to remember.
Examples of domain names are digitalbizweb.com, disney.com, incomeschool.com, umich.edu, Bluehost.com, game.net, meta.ai, and so on.
Here’s how to get your domain name:
- Decide on a domain name
- Go to a registrar and search for it. Domain name registrars include Namecheap.com, Cloudflare.com (recommended), Godaddy.com, etc.
You could also head straight to a WordPress hosting provider like Bluehost and there you can buy a domain name and set up hosting all in one go. No need to buy a domain name and hosting separately and then have to link them. - When you find your desired name, add it to the cart and pay for it.
That’s it. Now you have a brand new domain name anyone can visit from anywhere in the world.
Next is hosting.
2. Get Hosting
As I mentioned earlier, you can buy a domain name, set up hosting, then connect them.
Alternatively, you can head over to a hosting company like Bluehost and there, you can buy domain name and hosting in one bundle.
This way, your site will go live with a WordPress installation and you won’t have to link things separately. I hope that makes sense.
You may want to set things up on your own if you can’t afford a host that links things up at once for you.
To get hosting follow the steps below.
- Pick a Managed WordPress hosting company. Let me suggest a few of the best. They are Cloudways (my favorite, can host multiple sites well), Bluehost (will connect your domain name and hosting at once), EasyWP (not as good as the others but you’ll get one month free.)
- Select a hosting plan.
- Make payment for the chosen plan
- Install WordPress if you haven’t done that already.
On a Managed Hosting platform, installing WordPress is always easy and takes a few minutes. But if you’re not too good with setting things up, contact support and they’ll help you out.
Now that you have a domain name and hosting, you have to link them.
The domain name is what points people to your site and hosting is what houses the resources on your website.
Your hosting provider will have a resource on how to connect your domain name to your new hosting on their platform.
And you can always reach out to the 24/7 customer support and they’ll help you connect your domain name to hosting.
3. Pick and Install a Theme
Do you love beautiful things? I do too. Why? Because your theme will detect how your entire site looks and feels.
From the design to the structure to speed, even SEO, your theme plays a huge part in making your website look and feel good.
I’m going to suggest the best themes to get started with but first things first.
So how do you pick a good theme?
Here are the features to look out for when selecting a WordPress theme:
- Design: do you love what it looks like? First impressions matter. Although content is the most important thing, the way you look plays a huge part in what people think of you. So pick a decent theme.
- Functionality: Is it customizable? How much can you change to make the theme what you really want, as no theme will ever be perfect for anyone. So if it’s customizable enough then that makes it a good option for you.
- Structure: Does the structure fit what you want to use it for? The structure for a portfolio site will be different from that of a site you want to use as a blog. So open the theme and look at the homepage, blog, single post page, and see if it works for you.
- Efficiency: Check if the theme loads fast (you can try the starter site on GTMetrics.com), check if it’s built with good SEO features (you can find this in the theme documentation).
- Pricing: Is the theme free or paid? We have lots of free themes out there. Most themes will come with a free and pro version. If you love the pro version but can’t afford it, see if you can make do with the features in the free version before going for it.
Recommended WordPress Themes
I had to give you the ideas needed for picking a good theme. However, nothing beats experience and testing.
Here are the top themes I can always recommend.
- Rishi Theme: This is the theme I’m using. Its top features include fast loading pages, SEO, completely customizable in every way, classy starter sites for business, blogs, etc., featured image captions for image credits, and lots more. And you can get all these with a free version. The pro version? Exceptional to say the list.
- Other top themes: We have other top WordPress themes as well. Examples are Neve (free and paid), Generate Press (paid), and Astra (free and paid). These are the themes I can recommend based on experience.
- Shop for Themes: You can always get themes from places like Etsy. There are custom-made themes you can order on such platforms.
Install Your WordPress Theme
With WordPress, you can either install a theme directly from the WordPress themes repository. But for themes that are not listed there, you’ll have to download the zip file and upload it to WordPress.
But here’s the conventional way of installing themes.
To install a theme on WordPress:
- Go to your WordPress dashboard
- Click on Appearance
- Click on Theme
- Click on Add New
- Find and pick a theme from the available options. If your theme is not listed there, you’ll have to upload the ZIP file to WordPress, so go get it and install it.
- Once you have selected or uploaded a theme, look for the Activate button and click on it to activate the theme. If the theme is installed but you have lost track of things, Go back to Appearance >> Themes >> select the theme you want to activate and click on Activate.
- Install necessary plugins if any.
- Install the starter site. Nearly every theme will come with starter sites, so get the starter site you picked for the theme.
- Save changes.
Now that you’re done installing your theme, it’s time to customize.
But before you do so, you’ll have to make a child theme.
A child theme is a clone of the parent theme. This ensures you don’t lose the changes you make to the theme when the parent theme receives new updates.
Otherwise updates may overwrite your changes and spoil everything you’ve worked on.
How to make a Child Theme
- Go to Plugins
- Install the Child theme Configurator Plugin by Lilaea Media
- Use it to create a child theme for your website
- Preview the child theme (you want your child theme to look exactly like the parent theme)
- Activate the child theme if you’re okay with how it looks.
So the theme you installed originally will be the parent theme and the one you’ve created will become the child theme. This is the theme you’ll be using.
Now you can go ahead and customize your theme without any worries.
Your child theme will receive new features and updates just as your parent theme. The only thing is that those updates won’t mess with your customizations and that’s a win-win.
4. Install Necessary Plugins
Most themes will need certain plugins to work well.
For example, there are themes that will need you to install a page builder plugin like elementor.
Some others come with their custom-made plugins. Such plugins help add more features and customization options to the theme.
So check and install the needed plugins.
You may also have plugins of your own to install. Do this so you can see how they work with your new theme.
5 Set up your homepage
Here is where we start setting up our website.
Most themes and starter sites will set a homepage for you. If not, here’s how to set one.
- Go to Setting >> Go to Reading >> Pick a preferred page as your site’s homepage >> Save Changes.
You can think of your homepage as the living room.
This is where people land on when they visit your default domain name URL.
So you want to make it welcoming. It should show the visitor what you’re all about and also show them the way to useful information, blog posts, and any other products you’re offering.
Many people set up blogs and homepages wrong because they think it’s always about them.
Well, it’s a little bit about you but more about making things useful and appealing to your visitor.
- To design your homepage, Go to Pages >> Find your Homepage (you’ll find the homepage label somewhere not to it) >> Click on Edit next to it (if your theme is using Elementor, Click on Edit with Elementor). Then you can start designing your home page.
Here is a sample framework for building a good homepage.
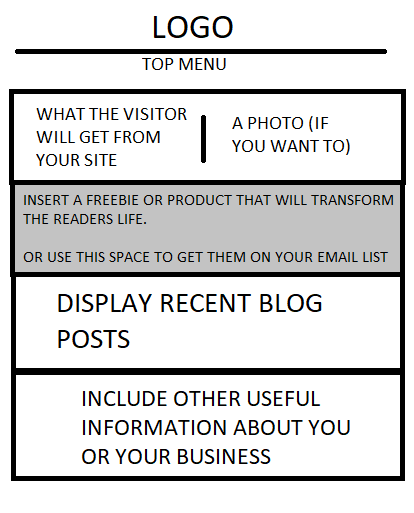
- Logo and Menu: This depends on your theme and how you want to do it.
- Under the Logo and Menu: Tell your readers what you’re all about, you could include your picture or an image that represents your message.
- Then place a CTA to get them to join your email list, get a free product, or use it to display a product you sell.
- Then display recent blog posts from your website. You can use a plugin for that if your theme is not giving you what you want.
- Then display other useful information. It could be about you, testimonials, about your website and where to find things, or another invitation to subscribe to your email list.
This should get you started with a homepage that looks good, speaks to the visitor, and can always convert them into subscribers and customers.
And if you have the time, I recommend you go check out other successful homepages in the niche you’re in.
Learn what they’re doing right and try to use it in a way that suits your business and brand.
You can also learn the best practices for setting up high-conversion homepages, especially if you have something to sell.
Don’t take your homepage for granted. Create it with purpose.
6. Set your Fonts
Fonts play a huge part on the look and feel of your site.
To set fonts, go to the customizer:
- To customize your Single Post Page, Go to Appearance >> Click on Customize >> Follow the labels to find the Typography (Fonts settings) >> make changes to the design >> Save changes or update your changes.
Set the font style and font size.
You want to have legible fonts that are of the right size.
Make sure the color is black (#000000) so it looks clean and easy to read.
Set font size and style for Headings: your H1 (main title), H2, H3, H4, etc. You should have the same font style for your heading.
But their sizes should make the hierarchy obvious. H1 should be the biggest, followed by H2, H3 and so on.
7. Design Your Blog Page
Your Blog page is the page that displays your blog posts.
Most Starter Sites will set up your blog page for you. But if they don’t, this is how to pick a blog page.
- Go to Setting >> Go to Reading >> Pick a preferred “Posts page” to be your blog page >> Save Changes.
It’s time to design your blog page.
You shouldn’t spend too much time on this one.
- To design your blog page, Go to Pages >> Find your blog page >> Click on Edit next to it (if your theme is using Elementor, Click on Edit with Elementor). Then you can start designing your blog page.
Here’s what you have to do.
- Decide whether you want your blog page to come with a sidebar or not.
- Then you can choose to allow or remove featured images for your blog posts.
- Select the position and font for the post title.
- Then choose the meta items you want to allow there. Most times I only include the author of the article and date published. You don’t have to have a messy blog page.
- Save changes or update the changes
8 Design Your Single Post Page
Your Single Post page is the default page for individual articles or blog posts on your site. Designing then, is about how a blog post will look like when someone opens one to read.
For example, if you’re reading this on the website, this page is a Single Post Page.
- To customize your Single Post Page, Go to Appearance >> Click on Customize >> Follow the labels to find the single post page >> make changes to the design >> Save changes or update your changes.
So you want to work on
- how the featured image is displayed (work on its size and position)
- the title
- the meta items like published date, comments
- Choose to display excerpts (Don’t neglect excerpts. If you use it well it can serve as bait to get the reader to click and read the full article)
- social icons (if available)
- the fonts on the article and
- how the comments section and related posts section will look like.
A few recommendations for your single posts page. Include things like written by, last updated, and share buttons.
And after the post, display related posts and tags. This works well when your theme allows you to do that. This is why Rishi is my go to theme right now.
Remove other meta items because they’ll mostly be useless.
Once you’re done, save changes and move on to the next thing.
9 Set up an Archive page
You know the category pages and other similar pages, those are your archive pages.
Most times that look like your blog page because they also display content but they are not the same.
So you want to set how your archive page looks. If someone clicks on a category on your site what will they see?
If you don’t know how to go about it, follow the instructions to get to the customizer.
- To customize your Single Post Page, Go to Appearance >> Click on Customize >> Find Posts/pages >> select Archive Page >> make changes to the design >> Publish changes or update your changes.
Choose if you want your archive pages to have a sidebar.
Also choose how the title and description (if your theme allows description) is displayed.
Choose how posts are displayed and the meta items you want readers to see.
Save changes. Now you have your archive pages done.
10. Set up Info and Legal Pages
Your info pages are like your Contact and About Pages. And legal pages are like your Privacy policy (most still file this under info though), Disclaimer, Terms of Use, Affiliate Disclaimer, Accessibility info, etc.
Depending on the niche, you may not need some of these pages. You may also need another that is not listed here.
Look at what other websites in the niche are doing. Ask around to get ideas. You will find people who have been there before you.
But if you can, I recommend getting a lawyer to help with the legal side of things on your blog.
If you’re making money or doing business on the website you’re creating, I would advise you to do what you can to comply with the laws of the land, even if it means paying a lawyer to help you figure things out.
- To set up an info or legal page, Go to Pages >> New Page >> Enter the required information on the page >> Publish it.
For a contact, you only need to include relevant information on that page. Just make it easy for people to connect with you and do business.
And if you publish your email address on your website, use a service like Cloudflare’s free service to hide your email and other sensitive information from bots.
As for legal pages, writing one can be difficult since we’re not all lawyers.
If you can’t afford a lawyer or any of the website legal templates online, there are free services that will generate a legal document for you.
A good example is Policymaker.io.
To create a legal document,
- Go to Policymaker.io
- Pick the template for a page you want to create. Example, Privacy Policy.
- Enter the required information, and you’ll have your legal document created
- Copy the document into your WordPress website.
- Format if necessary and publish it.
- Repeat the process to create all your legal pages, disclaimer, terms of use, etc.
And with that, you have your info and legal pages all done.
11. Create a logo for your website
Now it’s time to make a good logo for your website.
The reason I didn’t put logo creation early on is because most people spend too much time trying to make the ‘perfect’ logo.
With your logo, you’ll need a logo as a favicon and one for your header.
I create one for both – a simple icon that can serve both as a favicon and as a logo in the header, and the footer if I have to use it there.
This is why I go for a simple icon as my logo.
- To put a logo on your website, Go to Appearance >> Customize >> Unde WordPress Defaults, click on Site Identity >> Choose and upload a site icon
For header icon:
- Hold down the Shift (CMD) key and click on the edit icon next to the header
- One the editors pane to the left of your customizer, set your header to use logo and site title. This will allow you to use the icon you created and your title.
- Upload your icon
- Adjust the size of the icon and font size of the site title to fit on all devices.
- Save changes when you’re done.
How do you create a logo for your website?
There are many ways to get a logo or icon for your site.
Hire a logo creator to do it for you. If you know how to use design software, you can still make some for yourself on CorelDraw, Adobe, or whatever program you’re using.
You could still download an icon from sites on the internet. But know that you cannot trademark download icons and vectors.
I use canva.
- Go to Canva.com
- Search for a logo template (it should be a square)
- Find a template you like and click on it to open
- Edit your logo (don’t just download what you see, touch it a little but don’t spend too much time on it) Make sure it represents what you do. Add your site/brand colors.
- Download the logo (Make sure the size is at 500×500 pixels before downloading)
Your logo is ready! Go to the customizer and upload it for the site icon and header.
12. Set up Necessary Plugins
If you’re a freshman in the ‘school of WordPress’ you’re bound to be blown away with how handy plugins can be when you need to get things done.
What are plugins? I could answer this in my sleep now, feels like a nursery rhyme these days.
Plugins extend the functionality of your WordPress website.
Say you want to add a contact form to your website. Instead of building it from scratch using blocks of code and functions, you simply install a contact form plugin and use it to place a form on your website without having to code or build a form.
So what plugins should you have on your website and how many is too much.
Because every website will have its own unique set of needs, it’s difficult to compile a list of plugins that will work for every website.
But why do you need advice on plugins? So that you don’t end up overloading your website with plugins. It also helps you know the signals to look for when picking a plugin.
- To access Plugins? On your WordPress Dashboard, Go to Plugins and you’ll find a list of Active and inactive Plugins on your website.
- To add a new plugin, Click on Plugins >> Click on Add New Plugin (For plugins that are not available on the WordPress plugin repository, you will need to upload it to WordPress. But be careful about the source of such plugins. You don’t want to upload buggy plugins to your website).
You may already have a few plugins on your website from your theme or hosting company.
So Robert, what kind of plugins are necessary for my website? I have a curated list of plugins you’ll need on your website, their functions and how to make the most of them.
Follow the link to find Must-have WordPress Plugins for your website.
On your new website, you’ll need the following set of plugins:
- Page builders, example Elementor: This is for your site’s design and you probably have this already)
- SEO plugins, example All-in-One SEO and Yoast SEO: These plugins will help you optimize your website for search engines
- Speed Optimization plugins, example WP Optimize, Smush, WP Lazy Load: These ones will have you optimize your site to load quickly on desktop and mobile devices. They can also help optimize large images.
- Utility and Analytics, example Ad Inserter: These ones will help with adding some necessary features to your website like, affiliate disclosure and inserting Google ads and Google Analytics code.
Among all these, some will serve as temporary plugins and others will be permanent. To learn all about plugins, please see this article.
13. Site Launch Checks and Settings
Wow! We are almost there. Come on, give me a high five.
It’s almost time to launch your new WordPress website.
Let’s go over a few necessary things you have to put in place so you can launch a website that looks good on the outside and also works well on the inside.
- Most of these will be done inside settings. On your dashboard, click on Settings to open it up.
Here the a few things you need to work on
- Site Title and Description: Inside settings, click on General. Set the title and tag for your website. Here is an Example. Site Title: Digital Biz Web; Tag: Content Creation made easy!
- Permalink: Go set a permalink structure for your website. Go to Settings >> Permalinks >> select “Post name” >> Save Changes.
This will ensure your permalink is short and created from the title of your post. (However, always take the time to edit your link before publishing a post. Remove words like ‘of’, ‘and’. Leave only the necessary words in the URL. - Regulate Comments: Choose whether to allow or block comments. If it is a business website, it’s always a good idea to block comments out completely. If you want to have comments on your blog, make sure you are the one to approve them before the show on your website.
Here’s how to do it: Go to Settings >> Discussion >> Scroll down to “Before comment appears” >> Check the box with the label “Comment must be approved manually“.
This way, you will be the one to approve a comment before it can go live on your website. This will keep spam and shady links from showing up on your website. Remember you’re responsible for whatever readers find on your site. - Open your site to Search Engines: Be sure search engines can find your website before you launch it. Go to Settings >> Reading >> Scroll down to “Search engine visibility” >> Uncheck “Discourage search engines from indexing this site”. (Leave it alone if it’s already unchecked.)
- Add disclaimer to the top of posts: To do this, you’ll need a plugin called Ad Inserter. Once you’ve installed the plugin, go to Block 1, add the code snippet below and set it to show “Before Post”. Click on Save Setting 1 – 16 to save chnges.
<span style=”font-size: 16px; background-color: #F5F5F5;”>This post contains affiliate links, which means I may earn a commission if you click through and make a purchase. See my <a href=”https://mysite.com/mydisclaimer/” target=”_blank” rel=”noreferrer noopener”>disclosure</a> for more info.</span>
Remember to replace https://mysite.com/mydisclaimer/ with the link to your disclaimer or affiliate disclosure page. - Set up backups for your website: If you haven’t already, you need a way of backing your site. Sometimes we mess up settings or the design or structure of our website. Backups help you restore your site to its previous state, say, one hour before or to the last backup state if something like that happened. Your host will usually have this set up for you. Ask customer support if you’re not sure how to do it.
Alternatively, you can use a plugin. Updraft plus is the plugin you should go for. Install it and you’ll be able to back up your site for free to any cloud platform you choose.
14. Launch Your BRAND NEW WEBSITE!
“What is worth doing,” they say, “is worth doing well.”
Now it’s time to share your story with the world. Tell the world about your new website.
Post your URL on social media. Link your site on your social media profiles and invite people to your brand new world.
If you’re having any trouble setting up your website, drop a comment under this post and I’ll help you work it out.
And if this helped you to set up your website, drop the link here, I’d be happy to check it out.
FAQs on WordPress Website Setup
Let’s answer some common questions you may have about setting up a website on WordPress.
Can I make a website on WordPress for free?
When it comes to managed WordPress hosting (which is the recommended kind of hosting) you will have to pay for hosting.
How much does it cost to host a WordPress website?
It all depends on the provider and the payment plan you choose. Hosting can cost you somewhere from $4 per month to $14 per month.
How much does a domain name cost?
First-timers can get a domain name for less than $6 for one year on Namecheap.com. However, the price will double after one year. For a fixed domain name pricing, I recommend Cloudflare. Cloudflare will give you a domain name at a standard price of $9.77 per year.